
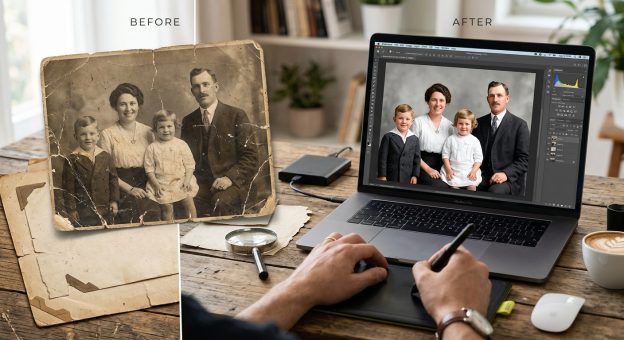
How to Restore Old Family Photos Using Free and Paid Tools
That shoebox in the closet holds more than old snapshots. It holds first birthdays, summer road trips, and faces of people who shaped who you are. But years in attics and damp basements have taken their toll. Photos crack, yellow, and lose contrast until they barely resemble the moments they once captured. The good news is that restoring them is now something almost anyone can do at home, with the right approach and a little patience.
Photo Restoration: Key Takeaways
- Scan prints at 600 DPI or higher to capture enough detail for editing
- Lightroom is a strong starting point for fading, color casts, and low contrast
- Photoshop gives precise control over scratches, tears, and missing areas
- AI restoration tools save serious time on complex damage, especially portraits
- Archiving finished images in multiple formats and locations protects your work long-term
Why Photos Deteriorate and What You Are Actually Working With
Not all old photos age the same way. Black and white prints from the mid-20th century often hold up better than color prints from the 1970s and 1980s. Those color prints used dye-based chemical processes that break down over time, shifting toward warm yellow or muddy magenta as the dyes separate. Humidity, prolonged light exposure, and acidic materials in old albums all accelerate the damage.
Before touching any software, take a close look at the print you have. Fading is the most common issue. Color casts come next. Physical damage like scratches, tears, and water stains requires a different approach than simple tonal corrections. Identifying what type of damage you are dealing with helps you choose the right tools and avoid spending an hour on the wrong problem.
Scanning Your Prints Before Anything Else
Any restoration lives or dies on the quality of the scan. A blurry or low-resolution file cannot be fixed in editing. You need to capture as much information as possible from the physical print before you open any software.
Follow these steps to get a solid scan every time:
- Clean the scanner glass with a lint-free microfiber cloth before placing any prints down
- Set the resolution to at least 600 DPI for standard prints, and 1200 DPI for small formats like wallet-sized photos
- Use the flatbed scanner’s preview function to check alignment before committing to the full scan
- Save the original scan as a TIFF file, which preserves maximum image data without compression loss
- Store the untouched original file in a separate folder before making any edits, treating it as your safety copy
If you only have a smartphone available, dedicated scanning apps with multi-frame capture and perspective correction can get you started. A proper flatbed scanner will almost always produce a cleaner result for serious restoration work, though. The Library of Congress publishes detailed guidance on digitizing personal and cultural collections, and their recommended practices track closely with what professional photo archivists use in the field.
Getting Started with Lightroom for Fading and Color Issues
Adobe Lightroom is the most accessible paid tool for the early stages of photo restoration. Every edit you make is non-destructive, meaning the original file is never altered. That makes it forgiving and ideal for experimenting without risk.
For faded black and white photos, start in the Basic panel. Pull the highlights down and lift the shadows to reclaim detail at both ends of the tonal range. Increasing Clarity adds back some mid-tone definition without making the image look artificially sharpened. The Tone Curve is useful for older prints where you want to add contrast while keeping the natural softness of the paper texture intact.
For color photos with a strong yellow or magenta shift, head to the White Balance controls first. Adjusting Temperature and Tint often fixes the bulk of a color problem in seconds. After that, use the HSL panel to target specific color channels. Pulling down the saturation on an oversaturated orange channel, for instance, can make skin tones look far more natural without touching the rest of the image.
Lightroom also includes a Healing tool that handles small dust spots and minor blemishes well. For anything larger than a narrow scratch, you will want to move into Photoshop for more precise control.
Using Photoshop to Fix Physical Damage
Photoshop is where the detailed repair work happens. Scratches, tears, and missing corners all require tools that Lightroom does not have. The learning curve is steeper, but the level of control is worth it for photographs that carry real meaning.
The Spot Healing Brush is your first stop for scratches and small marks. It samples the surrounding area automatically and fills in the damage with content that blends in. It works best on areas with consistent texture, like clear sky or a plain studio background. For more complex areas near faces or clothing, switch to the Clone Stamp tool and manually select your source area to get a more accurate result.
For large tears or missing sections, the Content-Aware Fill feature is a genuine time-saver. Select the damaged area with the Lasso tool, then go to Edit and choose Content-Aware Fill. Photoshop analyzes the surrounding image and generates replacement content based on patterns it detects. It is not always perfect on the first pass, but it gives you a strong foundation to refine manually afterward.
Always work on separate layers throughout this process. Keep the original scan on the bottom, and perform all healing and cloning on new layers above it. This preserves every decision and lets you undo specific edits without touching anything else.
Where AI-Assisted Restoration Changes the Equation
Manual editing in Photoshop takes real time. A heavily damaged photo can mean hours of careful work before it looks presentable. That is where AI-based tools have genuinely changed what is possible for people without professional editing experience or a spare afternoon.
AI restoration models are trained on millions of photographs and can recognize facial features, surface textures, and structural patterns far faster than a human can reconstruct them manually. They are particularly strong at recovering facial detail in portraits, smoothing out discoloration across large areas of a print, and filling in missing regions that would otherwise require extensive cloning.
Trying AI photo restoration before paying a professional service makes practical sense for most families. The results have improved dramatically over the past few years, and for many damaged prints, a single AI pass gets you 80 to 90 percent of the way to a finished result. You can then bring the output back into Photoshop for any final manual refinements where the AI fell short.
AI tools do have limits worth knowing about. Fine text, intricate decorative patterns, and complex backgrounds with multiple overlapping subjects can trip them up. For those cases, manual editing still wins. But for faded portraits and standard family snapshots with generalized damage, AI options are hard to argue against for the time they save.
Free Editing Tools Worth Knowing About
Not every restoration project needs a paid subscription. Several free tools handle real workloads without cutting too many corners.
- GIMP is the most capable free alternative to Photoshop, including clone stamp, healing brush, and curves tools for detailed repair work
- Darktable functions similarly to Lightroom for non-destructive tonal and color corrections, with a strong processing pipeline
- RawTherapee offers excellent noise reduction and sharpening, useful for scans that came out slightly soft or grainy
- Photopea runs entirely in a browser with a Photoshop-style interface and needs no installation or account
Free tools generally require more manual effort and a steeper learning curve than their paid counterparts. But for someone working through a manageable batch of family photos, they cover the essentials without the monthly cost.
Archiving and Printing Your Restored Photos
Finishing the restoration is only half the job. If your restored images live on one hard drive, they are one hardware failure away from being lost all over again.
Save finished restorations in at least two formats. Keep a full-resolution TIFF or layered PSD file as the master copy. Export a high-quality JPEG for sharing and printing. Store copies in at least two physical locations and use a cloud backup service as a third layer of protection. Most major cloud storage platforms offer photo-friendly plans that make this straightforward to maintain.
For printing, a professional photo lab will consistently outperform a home printer for longevity. Home printers use dye-based inks that can fade within a few years under normal light conditions. Pigment-based archival prints from a reputable lab can last for decades under standard display conditions. Ask for archival paper when placing your order, and request UV-resistant coating if the print will be displayed near a window.
Frame choices matter too. Acid-free matting and UV-filtering glass protect prints from two of the leading causes of long-term fading. For photos you plan to display for years, that small additional investment pays off in preservation.
Giving Old Photographs a Future They Deserve
Restoring family photos is one of those projects that starts as a chore and quietly becomes something more. You begin with a cracked, yellowed print and finish with a clear image of someone’s face that might otherwise have faded into nothing. The tools available today, from Lightroom and Photoshop to capable AI options and free editors, make that possible for almost anyone with a scanner and a few focused hours. Start with your best scans, work through the damage methodically, and save your results in multiple places. The photos that survive are the ones worth passing forward.